
Figure 115 Output for bgt command inside container
Figure 115 Output for bgt command inside container

Figure 116 Output for bgt command “inc”
| # | Action/Requirements | Complete? |
| 1 | The node is deployed in the local network in accordance with the instructions (see 6.1) | ▢ |
| 2 | The node has open ports as per requirements (see 6.2.3) | ▢ |
| 3 | The overall health of the node has been verified internally using the CLI. | ▢ |
| 4 | The node has an IP address accessible from the local/external network. For an Ubuntu system, use the official guide for configuring and checking system network interfaces | ▢ |
| 5 | You have API testing tools installed and prepared. Recommended: - CURL is a command-line utility for interacting with URL-based serves available for Linux and Windows operating systems (see user guide) - POSTMAN is a comprehensive API testing and development solution. See the official guide for using the system. | ▢ |

Figure 117 Test REST API with curl command line

Figure 118 Test REST API with POSTMAN tool
| # | Action/Requirements | Complete? |
| 1 | The node is deployed in the local network in accordance with the instructions (see 6.1) | ▢ |
| 2 | The node has open ports as per requirements (see 6.2.3). The standard port for using the Dashboard is 8003. | ▢ |
| 3 | The overall health of the node has been verified internally using the CLI. | ▢ |
| 4 | The node has an IP address accessible from the local/external network. For an Ubuntu system, use the official guide for configuring and checking system network interfaces. | ▢ |
| 5 | On the workstation, you have access to the network and downloaded browsers (we recommend MS Edge, Google Chrome, or Mozilla Firefox of the latest versions) | ▢ |
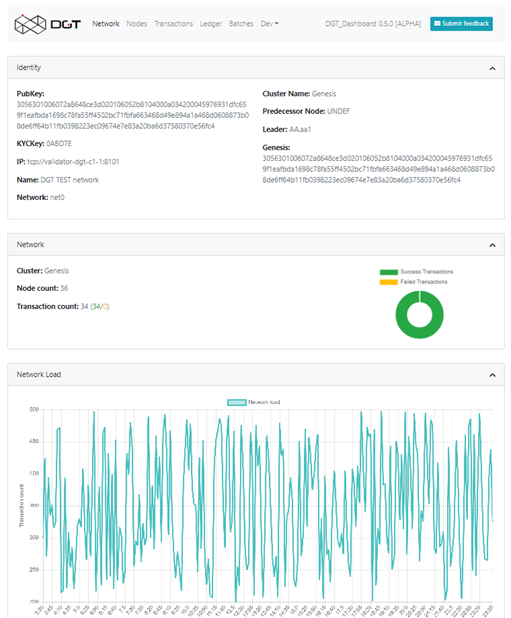
Figure 119 DGT Dashboard's main tab
- Family: bgt
- Url: tcp\://validator-dgt-c1-1:8108
- Command: set
|- wallet: WALX
- amount: 1000
| | ------------------------------------------------------------------------------------------------------------------------------------------------------------------- | ---------------------------------------------------------------------------------------------- | The name of the wallet and the BGT amount can be specified arbitrarily. Execute the transaction (Execute) and if successful, the results of the transaction will be similar to those shown below: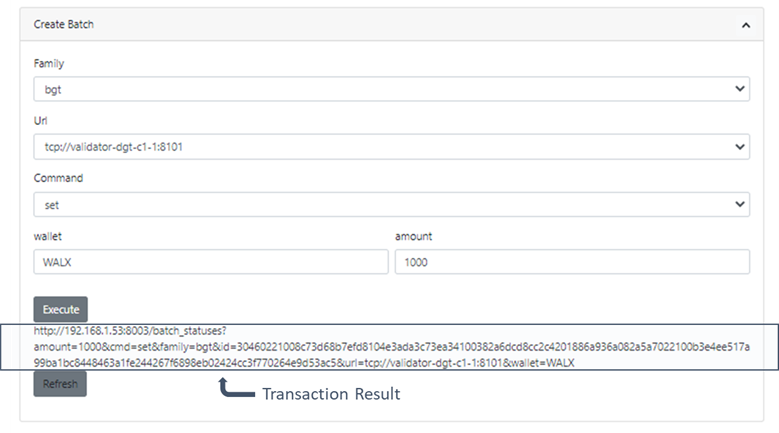
Figure 120 Transaction via DGT Dashboard
| # | Action | Description | Complete? |
| 1 | Check Environment | Make sure the system is deployed and assembled without errors, including the core services and Dashboard. Use the appropriate procedures (see below) | ▢ |
| 2 | Check CLI with BGT Transaction Family | Navigate to the command line of the deployed node with the « The command line prompt will change to « Run the command for creating the WALLET1 wallet. (or any other name, if this wallet was created earlier: « If successful, repeat the command for creating a second wallet: « Transfer tokens from the first wallet to the second: «
Print a list of wallets for the bgt family using the command: « The output should reflect the list of wallets and the wallet balances that changed due to the transfer: « | ▢ |
| 3 | Check CLI Command to show all transactions | Without leaving the CLI of the node, enter the command to display the list of transactions: « The command should display a list of all transactions in the DAG. | ▢ |
| 4 | Check CLI/xcert | To check the processing of certificates, we use the command of their creation based on the key generated earlier: « The successful output of the certificate’s contents guarantees the performance of the corresponding functionality.
The output of “ Close the CLI console with the “ | ▢ |
| 5 | API Quering | To check the functionality of the API, they must be accessed through the appropriate client tool. On the external machine, open the command line interface (or the POSTMAN toolkit). Execute the listing of transactions: « This command displays a list of transactions based on the network settings.
Additionally, let’s display the information for each separate transaction. To do this, copy the Transaction_ID (header_signature – 128-144-digit code in the form of “3046022…d630fd”) for any transaction randomly selected from the list. The output of transaction details is given by the command: « | ▢ |
| 6 | Dashboard Check | Checking the health of the Dashboard component (if it was installed) is carried out through the operations of the bgt family.
Load the Dashboard in the browser of the client computer: « Open the «Dev/Batch Creator» tab. Select the following in the Create Batch section: Family =
In the additional fields, enter the information about the transaction: wallet = “
Press execute and you should receive a link to the transaction status:
Press the Refresh button and you should receive the information on the transaction’s status; if successful, it will display: Copy the transaction ID: « Head over to the “Transactions” tab, find the transaction of the bgt family among the first lines, highlight it, and in the pop-up window, check the transaction id against the “ | ▢ |
| 7 | Direct BGT API | Check the processing of the bgt transaction (by direct API access) with the endpoint run and curl utility.
Create a new wallet:
In case of success, you should receive a check with a link to success.
The status of the created wallet is checked by the command:
In case of success, a link to the wallet and its value are returned: «
Reduce the number of tokens in the wallet by a sum exceeding the one set before:
This transaction returns a check with a display of the transaction (batch) ID: “
Verify the operation’s status:
With the output ID, the result is provided with the “
The wallet status is checked with the command:
It should display an unchanged balance of 1000 BGT | ▢ |